ShopDreamUp AI ArtDreamUp
Deviation Actions


Suggested Deviants
![[YCH 184 - 185] Special Poses](https://images-wixmp-ed30a86b8c4ca887773594c2.wixmp.com/f/9730b573-87b5-41f8-9ac3-e8b81fbd34ce/dc4q05z-903eb876-f2ce-41a7-bf36-6613b9b7443c.jpg/v1/crop/w_184,h_184,x_0,y_23,scl_0.051111111111111,q_70,strp/_ych_184___185__special_poses_by_seraphicmayin_dc4q05z-92s-2x.jpg?token=eyJ0eXAiOiJKV1QiLCJhbGciOiJIUzI1NiJ9.eyJzdWIiOiJ1cm46YXBwOjdlMGQxODg5ODIyNjQzNzNhNWYwZDQxNWVhMGQyNmUwIiwiaXNzIjoidXJuOmFwcDo3ZTBkMTg4OTgyMjY0MzczYTVmMGQ0MTVlYTBkMjZlMCIsIm9iaiI6W1t7ImhlaWdodCI6Ijw9MTM1MCIsInBhdGgiOiJcL2ZcLzk3MzBiNTczLTg3YjUtNDFmOC05YWMzLWU4YjgxZmJkMzRjZVwvZGM0cTA1ei05MDNlYjg3Ni1mMmNlLTQxYTctYmYzNi02NjEzYjliNzQ0M2MuanBnIiwid2lkdGgiOiI8PTkwMCJ9XV0sImF1ZCI6WyJ1cm46c2VydmljZTppbWFnZS5vcGVyYXRpb25zIl19.n768wU0dvp57hr062Zlb7HVZPlAOFugeFq9X5vGaC3k)
![[YCH 184 - 185] Special Poses](https://images-wixmp-ed30a86b8c4ca887773594c2.wixmp.com/f/9730b573-87b5-41f8-9ac3-e8b81fbd34ce/dc4q05z-903eb876-f2ce-41a7-bf36-6613b9b7443c.jpg/v1/crop/w_92,h_92,x_0,y_12,scl_0.025555555555556,q_70,strp/_ych_184___185__special_poses_by_seraphicmayin_dc4q05z-92s.jpg?token=eyJ0eXAiOiJKV1QiLCJhbGciOiJIUzI1NiJ9.eyJzdWIiOiJ1cm46YXBwOjdlMGQxODg5ODIyNjQzNzNhNWYwZDQxNWVhMGQyNmUwIiwiaXNzIjoidXJuOmFwcDo3ZTBkMTg4OTgyMjY0MzczYTVmMGQ0MTVlYTBkMjZlMCIsIm9iaiI6W1t7ImhlaWdodCI6Ijw9MTM1MCIsInBhdGgiOiJcL2ZcLzk3MzBiNTczLTg3YjUtNDFmOC05YWMzLWU4YjgxZmJkMzRjZVwvZGM0cTA1ei05MDNlYjg3Ni1mMmNlLTQxYTctYmYzNi02NjEzYjliNzQ0M2MuanBnIiwid2lkdGgiOiI8PTkwMCJ9XV0sImF1ZCI6WyJ1cm46c2VydmljZTppbWFnZS5vcGVyYXRpb25zIl19.n768wU0dvp57hr062Zlb7HVZPlAOFugeFq9X5vGaC3k)
![[YCH 197] Normal Person](https://images-wixmp-ed30a86b8c4ca887773594c2.wixmp.com/f/9730b573-87b5-41f8-9ac3-e8b81fbd34ce/ddiap5o-7f112a6a-5da7-4e39-8591-eb15b882b33e.jpg/v1/crop/w_184,h_184,x_0,y_150,scl_0.065248226950355,q_70,strp/_ych_197__normal_person_by_seraphicmayin_ddiap5o-92s-2x.jpg?token=eyJ0eXAiOiJKV1QiLCJhbGciOiJIUzI1NiJ9.eyJzdWIiOiJ1cm46YXBwOjdlMGQxODg5ODIyNjQzNzNhNWYwZDQxNWVhMGQyNmUwIiwiaXNzIjoidXJuOmFwcDo3ZTBkMTg4OTgyMjY0MzczYTVmMGQ0MTVlYTBkMjZlMCIsIm9iaiI6W1t7ImhlaWdodCI6Ijw9MzgzMCIsInBhdGgiOiJcL2ZcLzk3MzBiNTczLTg3YjUtNDFmOC05YWMzLWU4YjgxZmJkMzRjZVwvZGRpYXA1by03ZjExMmE2YS01ZGE3LTRlMzktODU5MS1lYjE1Yjg4MmIzM2UuanBnIiwid2lkdGgiOiI8PTkwMCJ9XV0sImF1ZCI6WyJ1cm46c2VydmljZTppbWFnZS5vcGVyYXRpb25zIl19._CTdKRZf56-etON8lBlAF80emAIb4JX8v9oIGZedsfk)
![[YCH 197] Normal Person](https://images-wixmp-ed30a86b8c4ca887773594c2.wixmp.com/f/9730b573-87b5-41f8-9ac3-e8b81fbd34ce/ddiap5o-7f112a6a-5da7-4e39-8591-eb15b882b33e.jpg/v1/crop/w_92,h_92,x_0,y_75,scl_0.032624113475177,q_70,strp/_ych_197__normal_person_by_seraphicmayin_ddiap5o-92s.jpg?token=eyJ0eXAiOiJKV1QiLCJhbGciOiJIUzI1NiJ9.eyJzdWIiOiJ1cm46YXBwOjdlMGQxODg5ODIyNjQzNzNhNWYwZDQxNWVhMGQyNmUwIiwiaXNzIjoidXJuOmFwcDo3ZTBkMTg4OTgyMjY0MzczYTVmMGQ0MTVlYTBkMjZlMCIsIm9iaiI6W1t7ImhlaWdodCI6Ijw9MzgzMCIsInBhdGgiOiJcL2ZcLzk3MzBiNTczLTg3YjUtNDFmOC05YWMzLWU4YjgxZmJkMzRjZVwvZGRpYXA1by03ZjExMmE2YS01ZGE3LTRlMzktODU5MS1lYjE1Yjg4MmIzM2UuanBnIiwid2lkdGgiOiI8PTkwMCJ9XV0sImF1ZCI6WyJ1cm46c2VydmljZTppbWFnZS5vcGVyYXRpb25zIl19._CTdKRZf56-etON8lBlAF80emAIb4JX8v9oIGZedsfk)
![[YCH 119- OPEN] Bite Me](https://images-wixmp-ed30a86b8c4ca887773594c2.wixmp.com/f/9730b573-87b5-41f8-9ac3-e8b81fbd34ce/da6bvbv-a7d0dcf9-0b13-430e-a09f-8c72fa1df56d.jpg/v1/crop/w_184,h_184,x_12,y_0,scl_0.076666666666667,q_70,strp/_ych_119__open__bite_me_by_seraphicmayin_da6bvbv-92s-2x.jpg?token=eyJ0eXAiOiJKV1QiLCJhbGciOiJIUzI1NiJ9.eyJzdWIiOiJ1cm46YXBwOjdlMGQxODg5ODIyNjQzNzNhNWYwZDQxNWVhMGQyNmUwIiwiaXNzIjoidXJuOmFwcDo3ZTBkMTg4OTgyMjY0MzczYTVmMGQ0MTVlYTBkMjZlMCIsIm9iaiI6W1t7ImhlaWdodCI6Ijw9NzIwIiwicGF0aCI6IlwvZlwvOTczMGI1NzMtODdiNS00MWY4LTlhYzMtZThiODFmYmQzNGNlXC9kYTZidmJ2LWE3ZDBkY2Y5LTBiMTMtNDMwZS1hMDlmLThjNzJmYTFkZjU2ZC5qcGciLCJ3aWR0aCI6Ijw9OTAwIn1dXSwiYXVkIjpbInVybjpzZXJ2aWNlOmltYWdlLm9wZXJhdGlvbnMiXX0.e4q9-L48eFG8yj25vmw19xzrLTZ1U47TyULhTxhPMFI)
![[YCH 119- OPEN] Bite Me](https://images-wixmp-ed30a86b8c4ca887773594c2.wixmp.com/f/9730b573-87b5-41f8-9ac3-e8b81fbd34ce/da6bvbv-a7d0dcf9-0b13-430e-a09f-8c72fa1df56d.jpg/v1/crop/w_92,h_92,x_6,y_0,scl_0.038333333333333,q_70,strp/_ych_119__open__bite_me_by_seraphicmayin_da6bvbv-92s.jpg?token=eyJ0eXAiOiJKV1QiLCJhbGciOiJIUzI1NiJ9.eyJzdWIiOiJ1cm46YXBwOjdlMGQxODg5ODIyNjQzNzNhNWYwZDQxNWVhMGQyNmUwIiwiaXNzIjoidXJuOmFwcDo3ZTBkMTg4OTgyMjY0MzczYTVmMGQ0MTVlYTBkMjZlMCIsIm9iaiI6W1t7ImhlaWdodCI6Ijw9NzIwIiwicGF0aCI6IlwvZlwvOTczMGI1NzMtODdiNS00MWY4LTlhYzMtZThiODFmYmQzNGNlXC9kYTZidmJ2LWE3ZDBkY2Y5LTBiMTMtNDMwZS1hMDlmLThjNzJmYTFkZjU2ZC5qcGciLCJ3aWR0aCI6Ijw9OTAwIn1dXSwiYXVkIjpbInVybjpzZXJ2aWNlOmltYWdlLm9wZXJhdGlvbnMiXX0.e4q9-L48eFG8yj25vmw19xzrLTZ1U47TyULhTxhPMFI)


Suggested Collections


You Might Like…


![[STUDY] same chara different face style](https://images-wixmp-ed30a86b8c4ca887773594c2.wixmp.com/f/2ba8b7ca-7793-4fdc-9081-f84122a21e98/day1sum-2db6bf38-78be-4019-8a1c-87855b9d0f8b.png/v1/crop/w_184,h_184,x_10,y_0,scl_0.1505728314239,q_70,strp/_study__same_chara_different_face_style_by_xcrowe_day1sum-92s-2x.jpg?token=eyJ0eXAiOiJKV1QiLCJhbGciOiJIUzI1NiJ9.eyJzdWIiOiJ1cm46YXBwOjdlMGQxODg5ODIyNjQzNzNhNWYwZDQxNWVhMGQyNmUwIiwiaXNzIjoidXJuOmFwcDo3ZTBkMTg4OTgyMjY0MzczYTVmMGQ0MTVlYTBkMjZlMCIsIm9iaiI6W1t7ImhlaWdodCI6Ijw9ODQxIiwicGF0aCI6IlwvZlwvMmJhOGI3Y2EtNzc5My00ZmRjLTkwODEtZjg0MTIyYTIxZTk4XC9kYXkxc3VtLTJkYjZiZjM4LTc4YmUtNDAxOS04YTFjLTg3ODU1YjlkMGY4Yi5wbmciLCJ3aWR0aCI6Ijw9MTAyNCJ9XV0sImF1ZCI6WyJ1cm46c2VydmljZTppbWFnZS5vcGVyYXRpb25zIl19.cPbgI_IrgRyRuoTWN23mQlIinO-g_PGxhidGO83HgpI)
![[STUDY] same chara different face style](https://images-wixmp-ed30a86b8c4ca887773594c2.wixmp.com/f/2ba8b7ca-7793-4fdc-9081-f84122a21e98/day1sum-2db6bf38-78be-4019-8a1c-87855b9d0f8b.png/v1/crop/w_92,h_92,x_5,y_0,scl_0.075286415711948,q_70,strp/_study__same_chara_different_face_style_by_xcrowe_day1sum-92s.jpg?token=eyJ0eXAiOiJKV1QiLCJhbGciOiJIUzI1NiJ9.eyJzdWIiOiJ1cm46YXBwOjdlMGQxODg5ODIyNjQzNzNhNWYwZDQxNWVhMGQyNmUwIiwiaXNzIjoidXJuOmFwcDo3ZTBkMTg4OTgyMjY0MzczYTVmMGQ0MTVlYTBkMjZlMCIsIm9iaiI6W1t7ImhlaWdodCI6Ijw9ODQxIiwicGF0aCI6IlwvZlwvMmJhOGI3Y2EtNzc5My00ZmRjLTkwODEtZjg0MTIyYTIxZTk4XC9kYXkxc3VtLTJkYjZiZjM4LTc4YmUtNDAxOS04YTFjLTg3ODU1YjlkMGY4Yi5wbmciLCJ3aWR0aCI6Ijw9MTAyNCJ9XV0sImF1ZCI6WyJ1cm46c2VydmljZTppbWFnZS5vcGVyYXRpb25zIl19.cPbgI_IrgRyRuoTWN23mQlIinO-g_PGxhidGO83HgpI)


Featured in Groups


Description
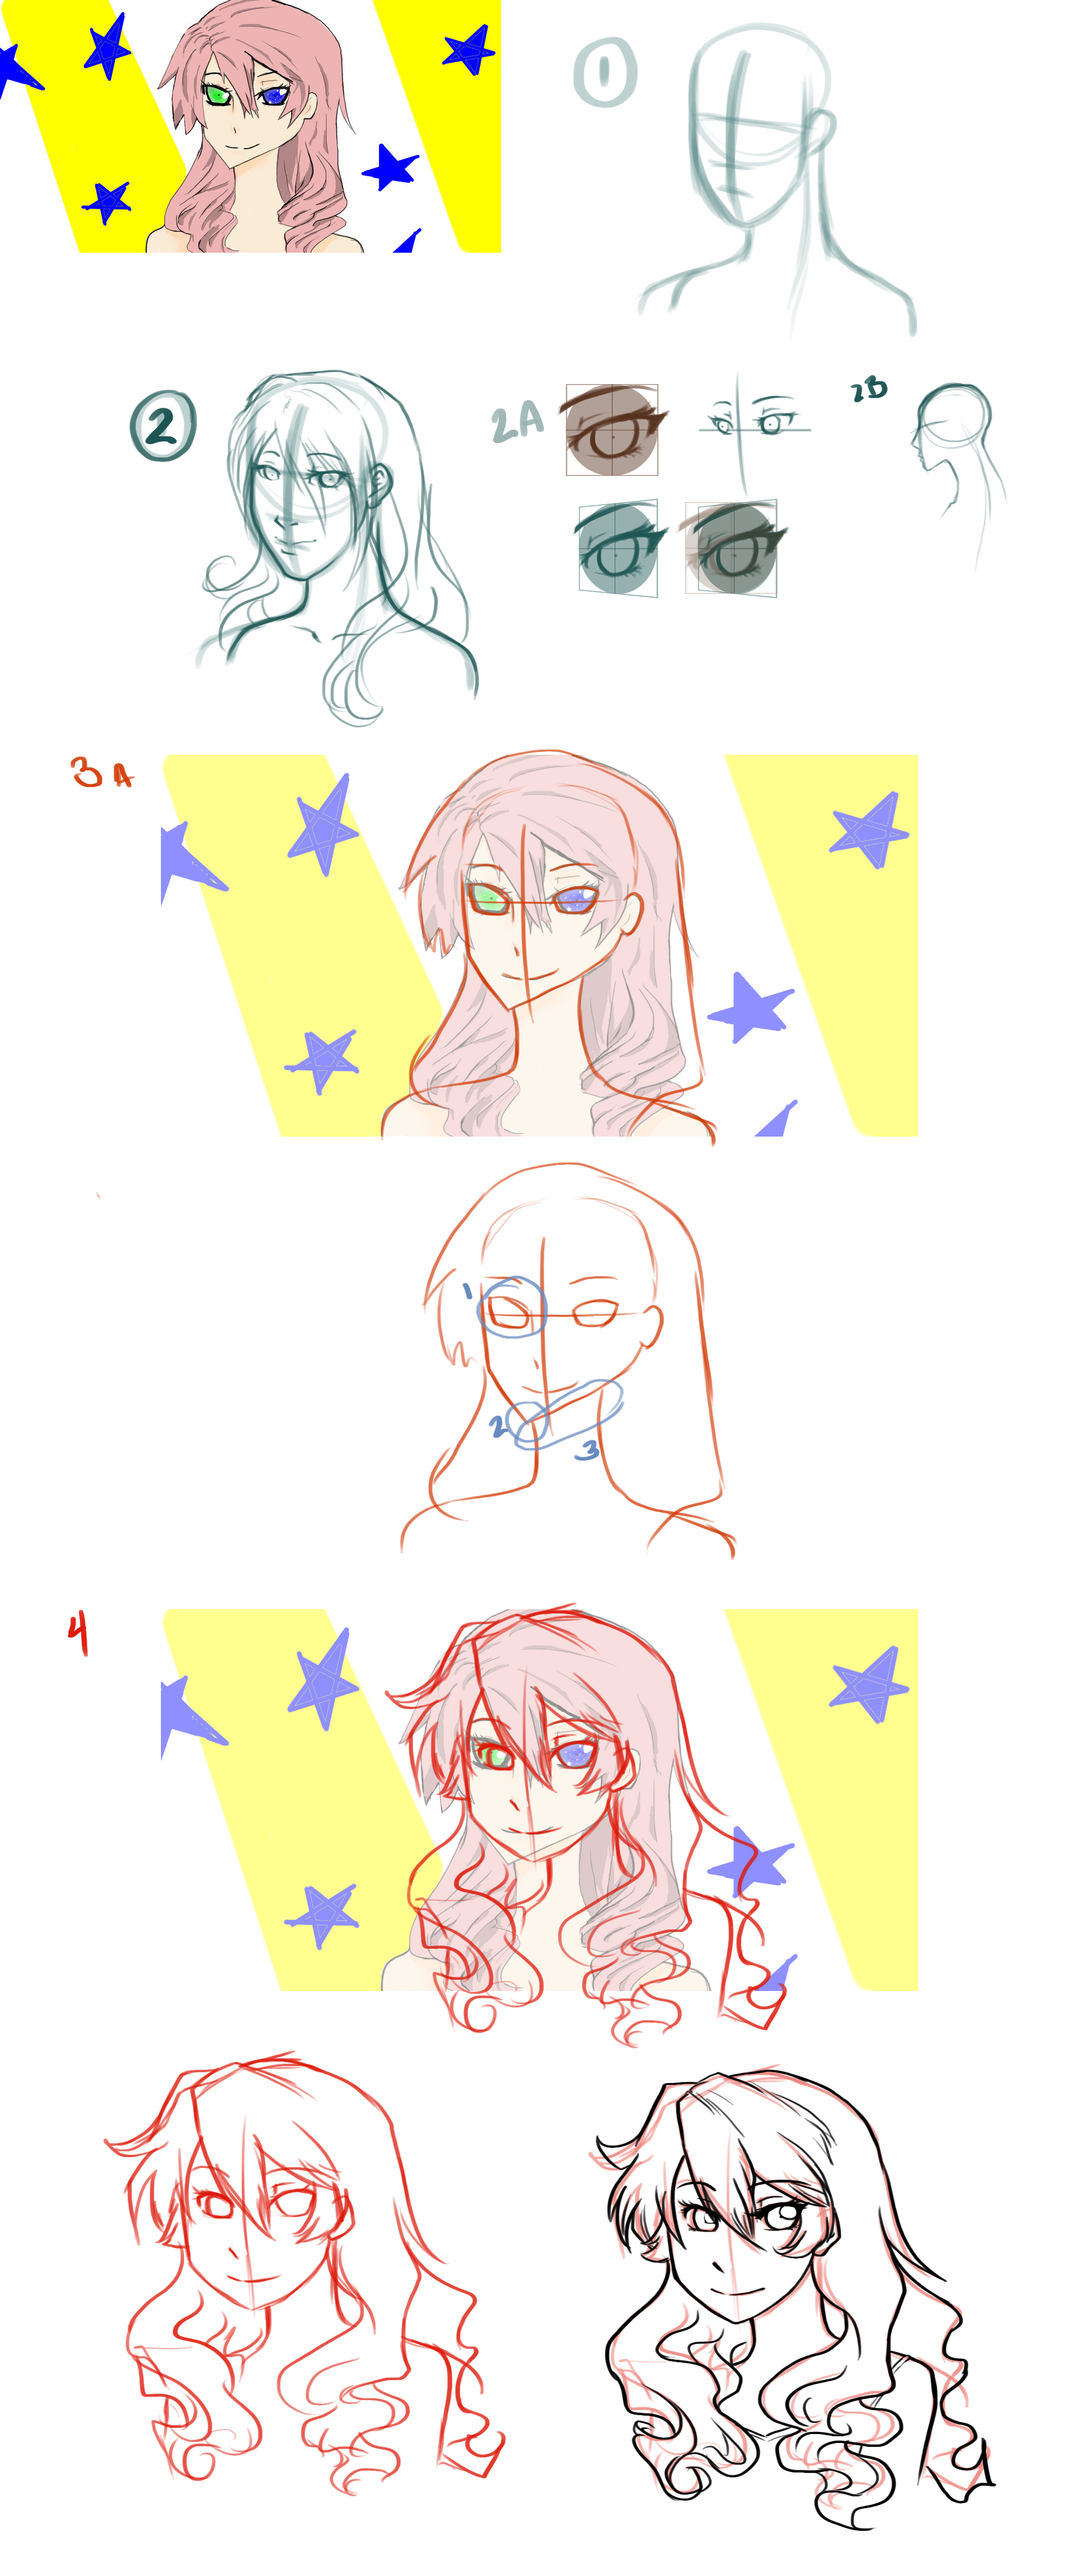
I decided to join the #Improvement-Club and do one of these a month (or when anything should strike my interest in my inbox).
The original:
To SilverfountainCrane:
First of all, I see you are using a painting program. I saw in the comments that it was Sketchbook Express, which I don't know much about, but I googled and it does in fact have layers. With that said, my VERY first piece of advice for you is to take more advantage of layers. Layers are your very best friend.
1) Now, when constructing a face, the first thing is to not be afraid. it's only a drawing, dearie, she won't bite :3 So just jump right in and never be afraid of making a mistake! Mistakes are your best friend, believe it or not! Now, when I started, I simple did a rough work of what the structure of the face would look like, using a low opacity large brush. NO DETAILS!
You will notice that I left some lines on there to let you see. I brought in the shoulder because after thinking a bit, I turned her shoulders a little away from the camera to match the angle of her face, which then gives it more of a feeling of depth.
2) Before I go into the specifics of putting things on the face, first I want to break down the eye, which you seemed to have said you had trouble with. First of all, every eye, no matter the style, is based on a real eye, which means it's based on a sphere. Now, I'm going to skip the mumbo jumbo of anatomy and get down to the dirty on perspective. I'm going to show you two ways that the eye can be represented at an angle in a simplistic, more anime style.
2A) As you can see I've broken down the eye to it's basic shape and placed on a square, aproximating where the actual sphere of the eye would be placed. The blue version is the eye distrorted into perspective. Now, this same effect is achieved WITHOUT what I did by simple nudging the proportions in. and you can see next to the original a freehand pair of eyes drawn in perspective. Freehand is in my opinion, always better. It's more natural and is dependent on the artist's skill and shows their comphrehension of what it is they are drawing.
Okay. So. Back to the head. Using a structure will help you fix your chin's misalignment and your neck positioning. If you look at someone's neck, it is seamless with the back of the skull and will actually angle back to create a natural curve (2B)
So I add in the details (which I won't go into. They are numerour tutorials on things like shapes of eyes, hair, etc etc.)
3) Now, let's redline to compare and I'll show you what kind of corrections you can do the actual piece.
3A) The three most important things that can be done to fix this, is...
1) the eye on the far side of her face is bigger than the one closer to us. It should be smaller to help with the illusion of receeding into space.
2) Her chin is misaligned with the centerline of her face, fixing this will also help her jawline going from her chin to her ear to not look quite so wide and close to her mouth.
3) her neck is directly underneath her mouth. It should be moved back to show proper proportions and anatomy.
4) I also notices that when I fixed her neck it would end up being VERY long, so I shortened it when I moved it back
And WALLA! Just three fixes and she looks great. I hope I helped, if anything didn't make sense, please ask.
Image size
1920x4628px 2.16 MB
© 2012 - 2024 Yokoboo
Comments4
Join the community to add your comment. Already a deviant? Log In
Wow.. you are amzing... 